|
|
|
|
|
|
|
|
|
Cranston Fine Arts  Aviation Art and Artists World War Two Veteran Signatures UK and Commonwealth B Aviation Art and Artists World War Two Veteran Signatures UK and Commonwealth B  Barthropp, Paddy Barthropp, Paddy |

Wing Commander Paddy Barthropp DFC AFC
At the outbreak of war Paddy flew obsolete Hinds, Hectors and Lysanders in combat, but converted to Spitfires and joined 602 Squadron at Tangmere. During the Battle of Britain he flew with some of the great aces - Douglas Bader, Sailor Malan, and Bob Stanford Tuck. In 1941 he was a Flight Commander with 610 Squadron. Continuing to fly Spitfires, now with 122 Squadron based at Hornchurch, he flew fighter sweeps and escort missions. On 17th May 1942 he was shot down over St Omer. He baled out but was captured, spending the next three years as a POW. One of the RAFs best known and best loved characters, though the bane of certain senior officers, Paddy Barthropps RAF service spanned the period from bi-planes to supersonic jets. Joining the RAF in 1938, his first squadron was 613 flying Hinds, Hectors and Lysanders. In 1940 he was released to fly Spitfires with 602 Squadron where he shared in the destruction of two aircraft. He was posted to 610 Squadron, and then to 91 Squadron, shooting down two Bf 109s during summer 1941 and receiving the DFC. In August 1941 he returned to 610 Squadron as a flight commander. He was shot down three times, the third time being taken prisoner ofwar. He had by then brought his total to 9. Scraps in the air were accompanied by scrapes on the ground, and appearances in Magistrates Courts for disorderly conduct. Addicted to fast cars and lively ladies - and the sworn enemy of stuffed shirts everywhere - he was the irrepressible life and soul of any party, and a persistant thorn in the side of overweening authority as the Germans were to discover. The war over, he was posted to the Empire Test Pilots School where he flew over a hundred different types of plane in ten months. Soon, he was out in the Sudan and in serious trouble again - under arrest after taking a hippo to an upper-crust party. As a boy, he had been taught to ride by champion jockey Steve Donaghue and now, posted to Hong Kong, he rode winners on the track at Happy Valley, and seriously thought of turning professional. Then it was back to the U.K. to take up an appointment as a Fighter Station Commander, and to lead the Coronation fly-past over Buckingham Palace. He left the RAF to set up his own luxury car-hire firm. He died on 16th April 2008.
 |
| Distinguished Flying Cross |
| Navigation | |
| Page 1 of 2 | Page 1 .. Next |
| Wing Commander Paddy Barthropp DFC AFC - Signed Aviation Art |
|
|
|
|
|
|
|
|
|
|
|
|
|
|
|
|
|
|
|
|
|
| Navigation | |
| Page 1 of 2 | Page 1 .. Next |
| Text for the above items : |
Channel Sweep by Richard Taylor. On 14th June 1940, the first German jackboots were heard on the streets of Paris. Within days France signed an armistice and Hitler could now turn his avaricious eyes north and across the grey waters of the Channel. The island of Britain stood alone and, faced with the threat of imminent invasion, few gave her much chance of survival. Before the all-conquering Panzers could invade, Germany needed to gain air superiority and Goering boasted that his Luftwaffe 'would quickly sweep the RAF from the skies' - how wrong he would be. The Battle of Britain began on 10th July 1940 and for the next eight weeks most front-line squadrons were often flying four missions a day. Totally outnumbered by the Luftwaffe the RAF was close to breaking point by early September, with some units reduced to a handful of pilots and aircraft. Then on 7th September, an over-confident Goering made a fatal error. Believing the RAF destroyed, he changed tactics and the Luftwaffe began bombing civilian targets in London. It was the respite that Fighter Command needed and the tide of battle was turned. Against overwhelming and seemingly impossible odds, a replenished RAF repelled the Luftwaffe and by the end of October it was over. Richard Taylor's stunning painting depicts Mk1 Spitfires from 92 Squadron undertaking a defensive sweep along the Kent coastline against a dramatic backdrop of the white cliffs of Dover, at the height of the battle in September 1940. |
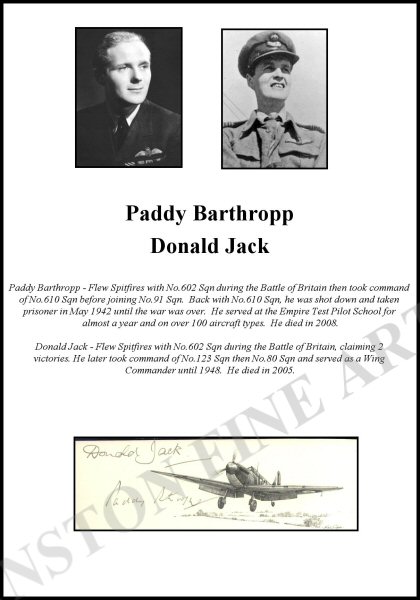
Clipped Signature - Paddy Barthropp. Paddy Barthropp - Flew Spitfires with No.602 Sqn during the Battle of Britain then took command of No.610 Sqn before joining No.91 Sqn. Back with No.610 Sqn, he was shot down and taken prisoner in May 1942 until the war was over. He served at the Empire Test Pilot School for almost a year and on over 100 aircraft types. He died in 2008. Clipped together with : Donald Jack - Flew Spitfires with No.602 Sqn during the Battle of Britain, claiming 2 victories. He later took command of No.123 Sqn then No.80 Sqn and served as a Wing Commander until 1948. He died in 2005. |
A Call to Arms by David Pentland. (P) Spitfires of No.603 Squadron, 23rd November 1940. The nearest aircraft is P7389 of Archie Winskill. |
Head to Head by Nicolas Trudgian A classic head-to-head combat between Squadron Leader Sandy Johnstone in his Spitfire and an Me109 over the south coast of England on 25th August, 1940. With 602 Squadron scrambled to intercept an approaching raid. The Commanding Officer notches up his second victory of the day. Published 2000. |
The Battle for Britain by Robert Taylor. A Battle of Britain Spitfire from 610 Squadron takes on a Me109 from I./JG3 in a head-on attack high over the south coast port of Dover, in the late morning of 10 July 1940. |
Defence of the Realm by Adrian Rigby. Pilot Officer Alan Wright flew with No.92 Squadron based at Pembrey. His aircraft, a Spitfire Mk I, is often seen as the symbol of the Battle of Britain, though in fact, the Hurricane bore the brunt of the fighting. Nonetheless, the Spitfires beautiful shape endears it to everyone and it remains a potent national symbol. This painting depicts an action which took place on 11th September 1940. Having already downed a Heinkel III, Wright claimed his first Me109 the same day. His final tally would be 11. Aircraft were frequently pushed to their limits of endurance and this Spitfire bears all the marks of many missions. |
Enemy Approaching by David Pentland. (P) Hurricanes of No.605 Squadron, October 1940. Aircraft pictured are P3308 UP-A of A A McKellar and N2471 of P Parrott. |
Evening Patrol by Gerald Coulson. During the early part of World War II the coastline of Britain was constantly under threat, particularly the busy shipping lanes of the North Sea. As well as carrying out bombing raids on strategic coastal targets and ports such as Luftflotte 5s attack on the north-east in August 1940, allied shipping was regularly attacked at sea as the Luftwaffe tried to disrupt supplies. The RAF played a vital part in protecting these supplies, escorting fishing fleets and shipping convoys, as well as long range patrols over the sea, seeking enemy activity and intercepting high altitude reconnaissance aircraft. These patrols were often long and arduous with pilots running the gauntlet of, if shot down, ditching into the sea. Often pilots would survive being hit and baling out, only to succumb to the freezing and hostile waters of the North Sea. Often fighter squadrons being rested during the Battle of Britain, would be moved to northern locations such as Acklington and Leconfield, and carry out coastal and sea patrols before returning to the more intense fighting in the south. Flying over the Humber Estuary as the sun is setting, pilots of 610 Sqn return their MKII Spitfires to Leconfield after a convoy patrol late in 1940. |
Defence of the Capital by Gerald Coulson. High over London, Hurricanes of 85 Squadron engage Me109s in an intense dogfight during the heavy fighting of August 1940. |
Fighting Lady by Graeme Lothian. A solo Spitfire on patrol off the coast of Dover during the Battle of Britain. |
Clipped Signature - Donald Jack. Donald Jack - Flew Spitfires with No.602 Sqn during the Battle of Britain, claiming 2 victories. He later took command of No.123 Sqn then No.80 Sqn and served as a Wing Commander until 1948. He died in 2005. Clipped together with: Paddy Barthropp - Flew Spitfires with No.602 Sqn during the Battle of Britain then took command of No.610 Sqn before joining No.91 Sqn. Back with No.610 Sqn, he was shot down and taken prisoner in May 1942 until the war was over. He served at the Empire Test Pilot School for almost a year and on over 100 aircraft types. He died in 2008. |
The Longest Day by Adrian Rigby. Published to commemorate the 60th anniversary of the D-Day landings on 6th June, depicting Spitfires of 44 Squadron led by Johnnie Johnson. |
The Right of the Line by Graeme Lothian. Sailor Malam leading 74 Squadron engaging Me109s of I/JG52 during the Battle of Britain, September 1940. |
The Great Escape by Richard Taylor. Everyone here in this room is living on borrowed time. By rights we should all be dead! The only reason that God allowed us this extra ration of life is so we can make life hell from the Hun.. ... three bloody deep, bloody long tunnels will be dug - Tom, Dick and Harry. On will succeed! With those words the chief escape officer in Stalag Luft III, Squadron Leader Roger Bushell RAF, announced his plan for perhaps the most daring escape attempt of the war - the mass break-out of 200 men through the digging of three long tunnels - nicknamed Tom, Dick and Harry - an audacious feat of tunneling that would be long and dangerous. Tom was discovered by the Germans and destroyed. Dick was abandoned. The escape would fall on Harry, and just after 22.00hrs on the night of 24th / 25th March 1944, the first escapee broke through to the surface - only to find it well short of the surrounding trees. The escapees would have to crawl to the cover of the trees under the noses of the patrolling sentries. It was obvious that not everyone would have time to get away. 76 men had made their escape when at 04.55 the escape was finally discovered by the guards. As shots rang out, those already in the trees began running for their lives. Of the escapees, three would make it home to the UK, the rest were recaptured. And of those, sadly 50 were executed by the Gestapo, but The Great Escape was already immortalised in history. |
Into the Fray by Richard Taylor. Squadron Leader Douglas Bader leads the Hurricanes of 242 Squadron in an aggressive diving attack upon a large force of Heinkel 111s approaching the Kent coast, whilst Spitfires from 66 Squadron tangle with the escorting Bf109s of JG52. It is September 1940, and the climax of the Battle of Britain. Throughout those critical months in 1940, the RAF engaged opposing pilots of the Luftwaffe time and time again and this atmospheric new painting depicts one such frantic engagement as one of the most legendary fighter Aces of the war, Douglas Bader leads his unit into battle. |
Hornchurch Scramble by Robert Taylor. On August 12th, 1940 the Luftwaffe turned their full attention to the RAF's forward fighter bases and radar stations with the intent to obliterate them once and for all. The outcome of the Battle of Britain hung in the balance. It was late in the afternoon of Sunday, 18 August 1940. The previous week had seen the hardest days of fighting in the Battle of Britain as the young pilots of the RAF Fighter Command had engaged in deadly duels with the Luftwaffe. Bystanders gazed cautiously upwards at the weaving contrails in the clear blue skies over southern England as they anxiously awaited the outcome. For just a moment, all was at peace: A gentle breeze floated across the airfield at RAF Hornchurch as the exhausted young pilots of 54 Squadron could rest for a few brief minutes and reflect on their own previous two encounters with the enemy that day. The Luftwaffe had thrown everything at them in the past few days, but today had been the toughest of them all. And then the calm was shattered by the shrill tones of the alarm, the Luftwaffe had launched another huge raid of over 300 aircraft across the Channel, and it looked like Hornchurch was the target. Hornchurch Scramble, portrays the moment as 54 Squadron's commanding officer, Squadron Leader James Leathart, taxis out at Hornchurch to prepare for take-off. Quickly following, the aircraft of New Zealander Colin Gray is guided out from dispersal by his ground crew. Gray would claim 3 Bf110s in the encounter and would eventually become the top scoring New Zealand Ace of the war. |
Tommy Leader by Robert Taylor. The long balmy summer days of 1940 provided perfect flying weather for the vast armadas of Luftwaffe bombers and fighters wreaking havoc over the southern counties of England. As summer wore on the enemy stepped up their attacks on airfields, radar stations, and shipping in the Channel, leaving RAF Fighter Command stretched to near breaking point. The Battle of Britain was at its peak; air-fighting reached an unimaginable intensity. Throughout the months of July, August, and September the destiny of Britain and the free world hung in the balance, resting upon the shoulders of a tiny band of youthful fighter pilots. Desperately short of aircraft, spares, and supplies, and with its young flyers heavily outnumbered, this heroic band of young men flew and fought from dawn to dusk in defence of their homeland until they drove the Luftwaffe from their precious skies. Their courage, skill, determination and sacrifice will forever be remembered for the battle they won. They rescued Britain from Nazi invasion and turned the tide in the Second World War. Fondly remembered for its part in the victory is the remarkable Hawker Hurricane: This tough, stable fighter bore the brunt of all operational flying during the epic air battle, no fewer than four-fifths of all air victories being credited to the pilots of this outstanding fighter aircraft. Without it the battle would have been lost. In his unrivalled and inimitable style, Robert Taylor has miraculously captured the mood so typical of those long frantic days: Fresh from yet another hectic combat high over the south coast, Flight Lieutenant Tom Dalton-Morgan and his wingman, hurry their Hurricane Mkls of 43 Squadron back to base at Tangmere. More fuel, more ammunition, a sandwich and a cup of coffee, and with that familiar roar of Merlin engines they will be airborne again, ready to engage the next wave of Luftwaffe raiders. In a few fleeting weeks Tom Dalton-Morgan will be promoted to Squadron Commander. |
Fight for the Sky by Robert Taylor. All through the long hot summer of 1940 they crossed the Channel from stolen bases in northern France, coming in mighty swarms to deliver their deadly cargo. Bombers and dive-bombers, single-seat fighters and fast twin-engined attack aircraft, their menacing shapes glinting with swastikas and black crosses, blackening the summer sky. Over 3000 aircraft were at the disposal of the boastful Luftwaffe supremo, Hermann Goering. Within just a matter of weeks, he promised Hitler, the RAF would be annihilated, allowing the invasion of Britain to proceed unhindered, and Britain would become the final piece of the jigsaw giving Nazi domination throughout Europe. Against the might of German airpower stood less than 600 Spitfire and Hurricane fighters, and as many young pilots determined to the man to defend their homeland. And so commenced the battle that was to develop into the greatest aerial conflict in history. Always outnumbered, often flying six sorties a day, the RAF's young fighter boys flew themselves to the point of exhaustion. Pilot losses forced desperate squadron commanders to take youngsters into combat, some with just a few hours on fighters. They flew and fought like tigers and they paid a heavy price, but never did they lose their spirit. Robert Taylor's wonderfully realistic painting captures the very essence of that epic battle. A Heinkel 111 has been brought down, one of many never to make it home on this bright and sunny day. As the Luftwaffe bomber's crew emerge from their broken aircraft, relieved to have survived the crash-landing, a Mk I Spitfire from No.66 Squadron roars low overhead to verify another victory. In the distance, Hurricanes from No 56 Squadron hurry back to North Weald to refuel and rearm. High above the battle rages, the vapour trails telling their own story. |
The Greatest Day by Robert Taylor. Sunday 15 September 1940 and Luftwaffe supremo Hermann Goering believed victory over the RAF was at hand. Today, he decreed, would be the day that his 'glorious' Luftwaffe would finally break the back of Fighter Command's stubborn resistance. Or so he believed. In response to a massed formation of enemy aircraft detected heading for London, Air Vice Marshal Keith Park commanding 11 Group scrambled his squadrons. He also requested that 12 Group bring Douglas Bader's 'Big Wing' down from Duxford. Every available pilot and machine was committed. Prime Minister Winston Churchill turned to Park and asked "What other reserves have we" "There are none", Park replied. Bader now had five squadrons racing south, meeting what remained of the enemy on the outskirts of London. With a successful morning behind them the RAF fighters raced back to re-fuel and re-arm. Just after 14.00 hrs another enemy battle group was observed and this time the formations were even larger. Bader's Wing was scrambled once more. |
Inspiration by John Young. Official limited edition print of the 60th Anniversary of the Douglas Bader Foundation. Douglas Bader (D-B) leading Dogsbody Section, 616 Squadron, including Johnnie Johnson (YQ-E) , Cocky Dundas (YO-A) and Jeff West (YQ-H) on his final operational take off from Westhampnett on August 9th 1941. |
Piece of Cake by Michael Turner. In the calm of a fine summer evening a group of Spitfires returns from the last sortie of the day. Two small boys and a passing cyclist watch as the leading Spitfire sweeps over the boundary of the temporary airfield. |
|
|
||
Paddy Barthropp with Archie Winskill, signing prints of - Fighting Lady - by Graeme Lothian. In the background are the original paintings Fighting Lady and Fighter General, both by Graeme Lothian. |
Paddy Barthropp signing the print - Defence of the Realm - by Adrian Rigby. |
||
| Wing Commander Paddy Barthropp DFC AFC Aircraft details |
Hector Manufacturer : Hawker | Hector No profile available |
 Hind Manufacturer : Hawker | Hind The Hawker Hind entered service with the Royal Air Force in November1935 and eventually 20 RAF bomber squadrons equipped with Hawker Hinds. Many Hinds were also sold to foreign customers including Afghanistan, the Irish Free State, Latvia, Persia (Iran), Portugal, South Africa, Switzerland, and Yugoslavia. The Hawker Hind was gradually phased out of frontline service from 1936 onwards and replaced by the Fairey Battle and Bristol Blenheim. At the outbreak of world war two only 613 squadorn was still equipped with Hawker Hinds in the roll of Army co-operation before re-equipping the Hawker Hector in November 1939. The Hawker Hind became a training aircraft from 1938 being the next step up from basic training on Tiger Moths. In 1941, Hinds flew combat missions in their original role as light bombers. South African Hinds were employed against Italian forces in Kenya, Yugoslav Hinds were used against the Germans and Italians. |
 Lysander Manufacturer : Westland Aircraft Built : 1786 | Lysander The first Lysanders entered service in June 1938, equipping squadrons for army co-operation and were initially used for message-dropping and artillery spotting. When war broke out in Europe, the earlier Mk Is had been largely replaced by Mk IIs, the older machines heading for the Middle East. Some of these aircraft, now designated type L.1, operated with the Chindits of the British Indian Army in the Burma Campaign of the Second World War. Four regular squadrons equipped with Lysanders accompanied the British Expeditionary Force to France in October 1939, and were joined by a further squadron early in 1940. Following the German invasion of France and the low countries on 10 May 1940, the Lysanders were put into action as spotters and light bombers. In spite of occasional victories against German aircraft, they made very easy targets for the Luftwaffe even when escorted by Hurricanes. Withdrawn from France during the Dunkirk evacuation, they continued to fly supply-dropping missions to Allied forces from bases in England; on one mission to drop supplies to troops trapped at Calais, 14 of 16 Lysanders and Hawker Hectors that set out were lost. 118 Lysanders were lost in or over France and Belgium in May and June 1940, of a total of 175 deployed. With the fall of France, it was clear that the type was unsuitable for the coastal patrol and army co-operation role, being described by Air Marshal Arthur Barratt, commander-in-chief of the British Air Forces in France as "quite unsuited to the task; a faster, less vulnerable aircraft was required." Nevertheless, throughout the remainder of 1940, Lysanders flew dawn and dusk patrols off the coast and in the event of an invasion of Britain, they were tasked with attacking the landing beaches with light bombs and machine guns.[9] They were replaced in the home-based army co-operation role from 1941 by camera-equipped fighters such as the Curtiss Tomahawk and North American Mustang carrying out reconnaissance operations, while light aircraft such as the Taylorcraft Auster were used to direct artillery. Some UK-based Lysanders went to work operating air-sea rescue, dropping dinghies to downed RAF aircrew in the English Channel. Fourteen squadrons and flights were formed for this role in 1940 and 1941. In August 1941 a new squadron, No. 138 (Special Duties), was formed to undertake missions for the Special Operations Executive to maintain clandestine contact with the French Resistance. Among its aircraft were Lysander Mk IIIs, which flew over and landed in occupied France. While general supply drops could be left to the rest of No. 138's aircraft, the Lysander could insert and remove agents from the continent or retrieve Allied aircrew who had been shot down over occupied territory and had evaded capture. For this role the Mk IIIs were fitted with a fixed ladder over the port side to hasten access to the rear cockpit and a large drop tank under the belly. In order to slip in unobtrusively the Lysanders were painted matte black; operations almost always took place within a week of a full moon, as moonlight was essential for navigation. The aircraft undertook such duties until the liberation of France in 1944. The Lysanders flew from secret airfields at Newmarket and later Tempsford, but used regular RAF stations to fuel-up for the actual crossing, particularly RAF Tangmere. Flying without any navigation equipment other than a map and compass, Lysanders would land on short strips of land, such as fields, marked out by four or five torches. They were originally designed to carry one passenger in the rear cockpit, but for SOE use the rear cockpit was modified to carry two passengers in extreme discomfort in case of urgent necessity. The pilots of No. 138 and from early 1942, No. 161 Squadron transported 101 agents to and recovered 128 agents from Nazi-occupied Europe. The Germans knew little about the British aircraft and wished to study one. Soldiers captured an intact Lysander in March 1942 when its pilot was unable to destroy it after a crash, but a train hit the truck carrying the Lysander, destroying the cargo |
 Spitfire Manufacturer : Supermarine Built : 20351 | Spitfire Royal Air Force fighter aircraft, maximum speed for mark I Supermarine Spitfire, 362mph up to The Seafire 47 with a top speed of 452mph. maximum ceiling for Mk I 34,000feet up to 44,500 for the mark XIV. Maximum range for MK I 575 miles . up to 1475 miles for the Seafire 47. Armament for the various Marks of Spitfire. for MK I, and II . eight fixed .303 browning Machine guns, for MKs V-IX and XVI two 20mm Hispano cannons and four .303 browning machine guns. and on later Marks, six to eight Rockets under the wings or a maximum bomb load of 1,000 lbs. Designed by R J Mitchell, The proto type Spitfire first flew on the 5th March 1936. and entered service with the Royal Air Force in August 1938, with 19 squadron based and RAF Duxford. by the outbreak of World war two, there were twelve squadrons with a total of 187 spitfires, with another 83 in store. Between 1939 and 1945, a large variety of modifications and developments produced a variety of MK,s from I to XVI. The mark II came into service in late 1940, and in March 1941, the Mk,V came into service. To counter the Improvements in fighters of the Luftwaffe especially the FW190, the MK,XII was introduced with its Griffin engine. The Fleet Air Arm used the Mk,I and II and were named Seafires. By the end of production in 1948 a total of 20,351 spitfires had been made and 2408 Seafires. The most produced variant was the Spitfire Mark V, with a total of 6479 spitfires produced. The Royal Air Force kept Spitfires in front line use until April 1954. |
| Wing Commander Paddy Barthropp DFC AFC Squadron details |
No.122 Sqn RAF Country : UK Disbanded 1st April 1946 Known Codes : , MT, | No.122 Sqn RAF Bombay Victuri volamus - We fly to conquer |
No.602 Sqn RAF Country : UK Disbanded 10th March 1957 Known Codes : , LO, ZT, DU, | No.602 Sqn RAF City of Glasgow (Auxiliary) Cave leonem cruciatum - Beware the tormented lion |
No.610 Sqn RAF Country : UK Disbanded 10th March 1957 Known Codes : , DW, JE, | No.610 Sqn RAF County of Chester (Auxiliary) Alifero tollitur axe ceres - Ceres rising in a winged car |
No.613 Sqn RAF Country : UK Disbanded 10th March 1957 Known Codes : , QJ, Q3, RAT, SY, ZR, | No.613 Sqn RAF City of Manchester (Auxiliary) Semper parati - Always ready |
No.91 Sqn RAF Country : UK Disbanded 31st January 1947 Known Codes : , DL, | No.91 Sqn RAF Nigeria We seek alone |
|
Contact Details |
Sign Up To Our Newsletter!
This website is owned by Cranston Fine Arts. Torwood House, Torwoodhill Road, Rhu, Helensburgh, Scotland, G848LE Contact: Tel: (+44) (0) 1436 820269. Email: cranstonorders -at- outlook.com
|