|
|
|
|
|
|
|
|
|
Cranston Fine Arts  Original Artwork Original Artwork |
| More Pages : Original Pencil Drawings |
| Navigation | |
| Page 18 of 55 | Previous .. Page 18 .. Next |
|
|
|
|
|
|
|
|
|
|
|
|
|
|
|
|
|
|
|
|
|
| Navigation | |
| Page 18 of 55 | Previous .. Page 18 .. Next |
| Text for the above items : |
Comanche Warrior c.1840s by Chris Collingwood. (P) No text for this item |
Surgeon Study by Graeme Lothian. (P) Surgeon, Camp Bastion. |
The Dambusters by Ivan Berryman. (P) Lancasters of 617 Sqn Dambusters get airborne from their Scampton base at the start of their journey to the Ruhr Valley on the night of 16th May 1943 under the codename Operation Chastise. These are aircraft of the First Wave, led by Wing Commander Guy Gibson, the Second Wave having already departed some ten minutes earlier to negotiate a more northerly route to their targets. On this momentous night, both the Möhne and Eder dams were successfully breached, whilst the Sorpe was also hit, but without serious damage. Of the nineteen aircraft that took part in the mission, eleven returned safely. |
Lysander Pick Up by Graeme Lothian. (P) A Lysander of 161 Squadron from RAF Tempsford banks to port as it circles a field somewhere in France 1943. These missions only took place on or around the full moon period to pick up or drop off SOE agents with the help of the Resistance. 161 Squadron, the most secret of all RAF squadrons, had in its flight, Lysanders, Hudsons, and Halifaxes which carried out parachute operations. Two of 161s top pilots Hugh Verity and Lewis Hodges both received the DSO & bar and DFC & bar, and from France the Legion dHonneur and the Croix de Guerre. |
Victory Parade by Ivan Berryman. (P) Ships of the Falklands Task Force formate following the Argentine surrender in 1982. Nearest is Leander class frigate HMS Andromeda with RFA Brambleleaf in her wake. The Type 22 frigate HMS Brilliant is to the left of the picture, with the carrier HMS Invincible dominating the right. HMS Hermes and her escorts are in the extreme distance. |
Birds Away by Randall Wilson (P) USS Long Beach became the first ship to ever shoot down aircraft using missiles. She is seen firing two Talos Missiles that downed two MIGs at a range of 80 miles in May 1968. |
Baptism of Fire - St Mihiel Salient, 12th - 15th September 1918 by David Pentland. (P) Renault FT 17 baby tanks of the recently formed US 304th tank brigade commanded by the young Lt. Col George S. Patton Jnr. are employed for the first time during the allied assault on the St Mihiel Salient. Leading the 344th battalion in person Patton and his tanks help the infantry divisions push the enemy back to the Hindenberg line in only 4 days. |
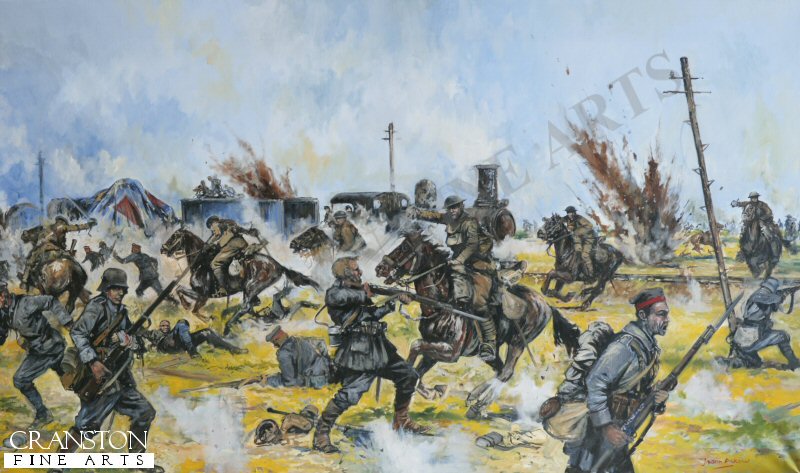
Inniskilling Dragoons at Amiens by Jason Askew. (P) The Inniskilling Dragoons capturing a German railway gun at Harbonnieres during the battle of Amiens, 1918. |
Soldiers Over Helmand by Graeme Lothian. (P) Soldiers aboard a Merlin helicopter over Helmand Province, Afghanistan, 2010. |
The Battle of Isandlwana by Jason Askew. (P) The Battle of Isandlwana on 22 January 1879 was the first major encounter in the Anglo-Zulu War between the British Empire and the Zulu Kingdom. Eleven days after the British commenced their invasion of Zululand in South Africa, a Zulu force of some 10,000-12,000 warriors attacked a portion of the British main column consisting of about 1,800 British, colonial and native troops and perhaps 400 civilians. The Zulus were equipped mainly with the traditional Assegai iron spears and cow-hide shields, but also had a number of muskets and old rifles though they were not formally trained in their use. The British and colonial troops were armed with the state-of-the-art Martini-Henry breech-loading rifle and two 7 pounder artillery pieces as well as a rocket battery. Despite a vast disadvantage in weapons technology, the numerically superior Zulus ultimately overwhelmed the poorly led and badly deployed British, killing over 1,300 troops, including all those out on the forward firing line. The Zulu army suffered around 350 killed, and up to several hundred wounded. The battle was a crushing victory for the Zulus and caused the abandonment of the first British invasion of Zululand. |
Raid on Wajir by Ivan Berryman. (P) The second half of 1940 saw repeated attacks by the Regia Aeronautica on Allied airstrips in East Africa, but its aging bomber force proved no match for the Hurricanes and Gladiators that offered a spirited defence. The airstrip at Wajir in Kenya was attacked several times by the Italians, but largely survived, the worst damage being the destruction of a fuel dump on 13th June. Here, a Gloster Gladiator of No.1 SAAF Squadron despatches a Caproni Ca.133, just south of Wajir. |
Climbout from Plivot by Ivan Berryman. (P) Bristol Blenheim IV N6215 of 139 Sqn is depicted departing the squadron's base at Plivot, France, on 12th May 1940. Sadly, it was a mission from which neither the aircraft, nor the crew would return, XD-Q being lost in a crash at Lanaken, Limburg in Belgium that same day with the loss of three crew. |
The Final Salvo - HMS Hood by Anthony Saunders. (P) HMS Hood readies to fire off a what proved to be the final salvo against the Bismarck before a shell from the German battleship penetrated the magazine of HMS Hood, tearing apart the British ship in an enormous explosion. |
HMS Captain at the Battle of Cape St Vincent by Ivan Berryman (P) Viewed across the damaged stern of the 80-gun San Nicolas, Nelson drives HMS Captain onto the Spanish vessel in order that she can be boarded and taken as a prize, the British marines and men scrambling up the Captains bowsprit to use it as a bridge. The San Nicholas then fouled the Spanish three decker San Joseph (112), allowing Nelson and his men to take both ships as prizes in a single manoeuvre. A British frigate is moving into a supporting position in the middle distance. |
Operation Skorpion by David Pentland. (P) Egypt, North Africa, 26th May 1941. Two Panzer IIIG's of Rommel's Afrika Korps advance towards Halfaya Pass during Operation Skorpion. Following the recent loss of the pass to the British in Operation Brevity, the Afrika Korps launched a counter attack to regain the vital position, and forced the British under Lt. Gen. Gott back to Sofafi and Buq Buq. |
Sopwith Camel by Anthony Saunders. (P) The Sopwith Camel was with the mainstay of the Royal Flying Corps. It is shown here downing an Albatros over the Western Front. |
Tribute to the 95th Rifles by Chris Collingwood. (P) In August 1808 the 2nd battalion of the 95th Rifles were part of the expedition commanded by Sir Arthur Wellesley to Portugal and covered the landings at Mondego Bay. On 15th August during a skirmish at Obidos, they had the distinction of firing the first shots of the Peninsular War against the French. The Rifles were trained to think quickly and by themselves in dangerous situations, they were also taught to work and fight together in pairs while firing harassing and well aimed shots at the enemy. The Baker rifle which the 95th used was an accurate weapon for its day, with reported kills being taken up to 270 metres away. During the Peninsular War, Rifleman Thomas Plunkett of the 1st Battalion, 95th Rifles, shot the French General Auguste-Marie-Francois Colbert at a range that may have been even greater. Rifleman Thomas Plunkett then shot a second French officer who rode to the general's aid. |
Mission to Yokohama, Japan, June 1944 by David Pentland. (P) Boeing B29 Superfortresses of the USAAF 40th Bomb Group come under attack from a Kawasaki Ki64 Hein (Tony) of the Japanese Army Airforces 244th Sentai. |
Arctic Waters by Randall Wilson. (P) Besstrashniy (meaning Fearless) 434 heavy rocket ASW Destroyer is shown swinging to the port side of Pyotr Velikiy (meaning Peter the Great) a Kirov Class Cruiser as they clear a path for the carrier Minsk. |
The Boscobel Oak by Ernest Crofts (P) The younger Charles, after escaping the Worcester rout, is hiding in a pollard oak, with the Roundheads hunting for him. |
Musa Qaleh Wadi by Graeme Lothian. (P) No text for this item |
|
Contact Details |
Sign Up To Our Newsletter!
This website is owned by Cranston Fine Arts. Torwood House, Torwoodhill Road, Rhu, Helensburgh, Scotland, G848LE Contact: Tel: (+44) (0) 1436 820269. Email: cranstonorders -at- outlook.com
|