|
|
|
|
|
|
|
|
|
Cranston Fine Arts  Naval Art and Artists Naval Artists Ivan Berryman Naval Art and Artists Naval Artists Ivan Berryman  Postcards Postcards |
[UP] - Royal Navy - US Navy - German Navy - French Navy - Italian Navy - Spanish Navy - Maritime Art - Trafalgar - The Nile - Copenhagen - Cape St Vincent - Original Paintings - Original Acrylic Paintings - Postcards |
| Navigation | |
| Page 1 of 11 | Page 1 .. Next |
|
|
|
|
|
|
|
|
|
|
|
|
|
|
|
|
|
|
|
|
| Navigation | |
| Page 1 of 11 | Page 1 .. Next |
| Text for the above items : |
HMS Ark Royal by Ivan Berryman (PC) HMS Ark Royal after a recent refit, rejoins the fleet in 2001. Additional colour added to enhance this previously black and white image. |
The Taking of the Lady Grace by Ivan Berryman. (PC) Although entirely fictitious, this scene depicts a typical action by pirates in the early 1700s, most likely in the Caribbean where the many supply routes from Europe converged and offered rich pickings. Although fraught with danger, the rewards for the buccaneers were rich and plenty, many of them rising to great notoriety for their daring exploits. |
MTB107 by Ivan Berryman. (PC) Commanded by Lord John Cameron, MTB107 took part in Operation Dynamo - the evacuation of Dunkirk in the first week of June 1940. Working with the destroyer HMS Vivacious, the Vosper Thornycroft experimental Motor Torpedo Boat delivered blockships overnight into June 3rd, partially blocking the channel of the port of Dunkirk. The next night, MTB107 worked with HMS Shikari to deliver two more blockships to complete the blocking of the channel. A third blockship was sunk in collision en-route, MTB107 picking up seven of the crew. |
HMS Esk by Ivan Berryman. (PC) Launched on 19th March, 1934, HMS Esk was converted for mine laying duties at the outbreak of the Second World War. A and Y turrets were removed, as well as both her quadruple torpedo launchers to enable her to carry larger mines. A small sponson was added at the stern to facilitate smooth launching of mines and depth charges. She Operated largely in the North Sea and in Norwegian waters, but was recalled to assist in Operation Dynamo, rescuing allied troops from the beaches of Dunkirk. Back in the North Sea, on 31st August 1940, Esk struck a German mine in an unmarked minefield and, during evacuation, a second explosion broke the ship in two with severe loss of life. She is depicted during operations in Norway, where her duties were to help stop German supplies arriving in Narvik. |
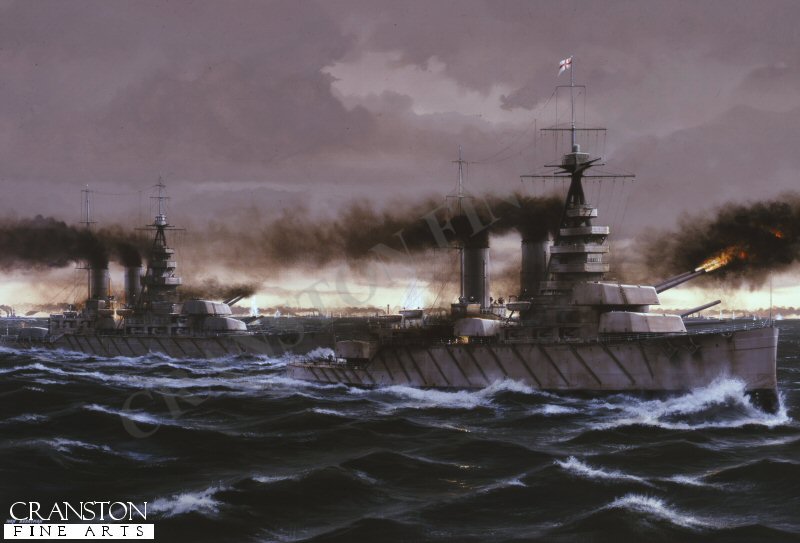
HMS Lion at the Battle of Jutland by Ivan Berryman. (PC) HMS Lion with her sister ship HMS Princess Royal are shown firing on the German High Seas Fleet which can be seen in the distance during the Battle of Jutland. |
Dunkirk by Ivan Berryman (PC) Between 24th may and 4th June 1940 an extraordinary armada of craft, large and small, naval and civilian, embarked on one of the greatest rescue missions in history. the evacuation of 330,000 British and French troops from the beaches of Dunkirk in northern France. the destroyer HMS Wakeful dominates the foreground here as troops pour onto the beaches and harbour moles in search of salvation. Both Wakeful and distant HMS Grafton were lost during the evacuation. Additional colour added to enhance this previously black and white image. |
HMS Sickle by Ivan Berryman. (PC) An S-Class submarine of the Royal Navy, HMS Sickle took part in operations in the Mediterranean in the Second World War after an uneventful first patrol off Norway. On the morning of 23rd of April 1943, five days into her second war patrol, HMS Sickle intercepted the Italian merchant Mauro Croce as it left Spanish waters from Valencia. Two torpedoes were fired but passed under the target. Immediately the submarine surfaced and, as seen in this painting, opened fire with the 76mm deck gun, scoring 15 hits from 19 rounds fired before the weapon jammed. HMS Sickle dived and broke off the action, but Italians later claimed three killed and four wounded in their complaint that the attack happened in Spanish territory. That May, HMS Sickle went on to attack German U-Boat U-755 unsuccessfully, but next day torpedoed and sank U-303. On her 11th war patrol in June 1944, HMS Sickle disappeared and is thought to have been lost to mines while returning to Malta. |
Brandenburg D.1 by Ivan Berryman. (PC) Designed by the great Ernst Heinkel, the diminutive D.1 was an essential stop-gap that provided the Austro-Hungarian pilots with a front line fighter until they were able to re-equip with Albatros scouts in the Summer of 1917. This little aircraft performed well and was generally held in high regard by its pilots, although it did have some shortcomings, namely that forward vision was extremely limited and the Schwarzloses gun was completely concealed in the overwing pod that made it inaccessible in the air. Most unusual of all was its interplane strut arrangement, designed to reduce drag, which gave it the nicknames Starstrutter or Spider. These examples are shown passing above the German cruiser Derfflinger. |
HMS Cossack by Ivan Berryman. (PC) HMS Cossack, one of the fast Tribal class destroyers will always be remembered for the daring rescue of 300 prisoners of war from the German Altmark in Norwegian waters. She is shown here departing Grand Harbour, Malta. |
HMS Euryalus by Ivan Berryman. (PC) HMS Euryalus, a Dido class cruiser, shown off the Bay of Naples. |
HMS Ark Royal (1970s Carrier) by Ivan Berryman. (PC) HMS Ark Royal was the fourth ship in the Royal Navy to bear this memorable name. By far the most impressive, this mighty ship was built to include the angled flight deck, a revolutionary development at the time, with steam catapult. The end of fixed wing aircraft saw Ark Royal quickly become obsolete, being paid off in 1978. |
HMS Glowworm's Attack on the Admiral Hipper by Ivan Berryman (PC) HMS Glowworm, burning severely after receiving hits from the mighty Admiral Hipper, 1s depicted turning to begin her heroic sacrifice off the Norwegian coast on 8th April 1940. Hugely out-gunned and already crippled, Glowworm's captain, Lieutenant Commander Roope rammed his destroyer into the side of the Admiral Hipper, inflicting a 40 metre rip in its armour belt before drifting away and exploding. 38 British sailors were rescued from the sea and Roope was awarded a posthumous VC for his bravery, the first earned by the Royal Navy in WWII. Additional colour added to enhance this previously black and white image. |
HMS Hood Passing Under the Forth Rail Bridge by Ivan Berryman (PC) HMS Hood passes beneath the forth Bridge on her way to Rosyth during one of her many visits to the Firth in the 1930s. the cruiser HMS Norfolk lies at anchor in the middle distance. |
Nemesis by Ivan Berryman. (PC) Arguably the most iconic moment in British naval history, HMS Victory is depicted just moments from firing her devastating opening salvo into the stern galleries of the French flagship Bucentaure at Trafalgar as Nelson's flagship enters the fray at approximately 12.30pm on October 21st 1805. Beyond Victory, in the extreme distance through the gun smoke, Collingwood's Royal Sovereignis engaging the Santa Ana. To the left of the painting, the French Neptune and Spanish San Justo can be seen with Redoutable immediately beyond Victory, trying vainly to close the gap. Victory, already shot to pieces, is about to wreak her terrible revenge on the Bucentaure in the foreground where Vice-Admiral Villeneuve can be seen on the poop deck - wearing the green corduroy pantaloons. Nelson was surely the nemesis of Villeneuve, who had been summarily humiliated some seven years earlier at the Battle of the Nile and Nelson's tactics would again win the day for His Majesty's navy, albeit at the tragic cost of Nelson himself. |
HMS Royal Oak by Ivan Berryman (PC) The R-class battleship Royal Oak lies at anchor in Scapa Flow between the wars ahead of her sisters Royal Sovereign and Revenge. HMS Repulse is passing the line on the left of the picture. Additional colour added to enhance this previously black and white image. |
HMS Eurydice at Anchor off Cowes by Ivan Berryman. (PC) After being re-commissioned under the command of Captain Marcus Augustus Stanley Hare, Eurydice sailed from Portsmouth on a three-month tour of the West Indies and Bermuda on 13th November 1877. On 6th March 1878, she began her return voyage from Bermuda for Portsmouth. After a very fast passage across the Atlantic, on 24 March 1878, Eurydice was caught in a heavy snow storm in Sandown Bay, within sight of the Isle of Wight, capsized and sank. Only two of the ship's 319 crew and trainees survived. Most of those who were not carried down with the ship died of exposure in the freezing waters. One of the witnesses to the disaster was a young Winston Churchill, who was staying at Ventnor with his family at the time. The wreck was re-floated later that same year but had been so badly damaged during her submersion that she was then subsequently broken up. Her ship's bell is preserved in St. Paul's Church, Gatten, Shanklin. There is a memorial in the churchyard at Christ Church, The Broadway, Sandown and the ship's anchor is set into a memorial at Clayhall Cemetery, Gosport. |
HMS K17 by Ivan Berryman. (PC) K17 was one of the unusual K-class submarines operating in the Royal Navy in World War One. This class were unusual in that they were powered by steam while operating on the surface to allow them the speed to keep up with the fleet. They were also unusual in their notorious poor fortune, gaining the nickname 'Kalamity Class'. None of the class ever successfully engaged with the enemy, and yet 6 were lost in accidents, including K17. Known as the 'Battle of May Island', a series of unfortunate collisions between submarines and surface vessels in the misty darkness of 31st January - 1st February 1918 saw both submarines K4 and K17 sunk, with several other vessels damaged. From a crew of 56, just 9 men escaped from K17 and just 8 survived the freezing waters. Here, K17 is shown cruising on the surface with funnels up in 1917. |
HMS Kelly passes HMS Royal Sovereign by Ivan Berryman. (PC) The destroyer HMS Kelly passes close to the battleship HMS Royal Sovereign as she escorts a convoy in the Mediterranean near Malta. |
The Brave Redoutable by Ivan Berryman. (PC) Already ravaged by incoming shot from the combined French and Spanish fleets as she approached the enemy line, HMS Victory found herself under intense attack from the French 3rd Rate 74-gun Redoutable. The two ships became entangled, grappling irons went across and the most terrible artillery battle commenced. Admiral Lord Nelson was fatally wounded by a shot from the Redoutables mizzen top before it was brought crashing down. Now the British three-decker, the 98-gun Temeraire appeared outboard of the Redoutable and began pouring further shot into her, the little French ship dwarfed by two mighty British vessels. But still she fought on, refusing to strike her colours. Of all the ships at Trafalgar, Redoutable sustained the highest casualties with 478 killed and 81 wounded. Depicted from left to right are HMS Temeraire, Redoutable and HMS Victory. |
|
Contact Details |
Sign Up To Our Newsletter!
This website is owned by Cranston Fine Arts. Torwood House, Torwoodhill Road, Rhu, Helensburgh, Scotland, G848LE Contact: Tel: (+44) (0) 1436 820269. Email: cranstonorders -at- outlook.com
|